
CardMaker Tutorial: Formatted Text: Inline Images
This guide covers the use of the img tag with FormattedText elements. This is a common use case for games that intend to use iconography within instructional text. You should have a functional knowledge of image pathing in relation to CardMaker projects before going through this tutorial.
- Setup
- Create a new FormattedText element
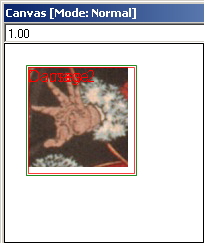
- Create a graphic (for use as your inline icon). The size is not critical for this tutorial.
- Set the Definition value of the element to: Causes 2 <img=attack.png> Damage (your image name may vary of course)
- The result may look something (ugly) like this:
- Fix the visual using Line Spacing and Scaling
- You should probably adjust the size of the FormattedText element to better fit your text (depending on how you want it to look and/or line wrap)
- Set the Definition value of the element to: Causes 2 <img=attack.png;0.9> Damage (The key part is the ;0.9 - It sets up the scaling of the image in relation to the Line Spacing setting)
- Set the Line Spacing value to something reasonable so your image appears as expected. If you do not set the Line Spacing (leaving it at zero) the image will scale based on zero and not display at all! This is a much more obvious problem if your text wraps across lines.
- The result should be something like this:

- Tips
- See the manual for the other options in the image tag. You can specify the absolute width and height of the image if necessary.
- If the image refuses to show up for some reason, be sure to try the exact same path in an Image element to verify there are no other issues.